Category: Projects
These are post about my projects.
Old tweets get posted.
My Midnight Rambling.
PS: Text di atas ini dijana oleh satu project baru saya. Kalau anda lihat betul-betul ianya adalah tweet-tweet yang diletakkan kat dalam perenggan. Kat atas ni juga ada sikit perbualan dengan @bardsham93. Sepatutnya tweet bard keluar, tapi atas sikit bug (yang dah dibetulkan), tweet dia tak keluar.
Stay calm everybody, this is just another blogmytweet test.
Assalamualaikum, apa khabar. Tiada apa nak ditulis, cuma nak test embedding post kat sini. Dibawah ni, ada iframe yang digenerate kat blogmytweet. So, thats it. Good bye.
Automatic IIUM Schedule Formatter V5
Assalamualaikum semua! Apa khabar?
Tanpa membuang masa lagi, dengan ini saya mengesahkan bahawa AIIUMSF versi 5 sudah online. V5 membawa Styler versi baru yang membawa beberapa perubahan yang memudahkan kerja-kerja me-style jadual. Jika anda pelajar IIUM yang baru tahu tentang kewujudan Automatic IIUM Schedule Formatter dan tidak berminat tentang apa yang baru di V5, silalah terus ke main page Automatic IIUM Schedule Formatter untuk manual pengguna/arahan/readme.
Disebabkan Styler digunakan oleh dua projek sekaligus, saya sekarang dengan rasminya menjadikan Styler sebagai projek-nya sendiri. Dan dalam versi styler ini, ada beberapa perubahan(dalaman) yang ketara berbanding sebelum ini. Kita mulakan dengan perkara yang paling tak ketara yakni, refactorization of Styler menghilangkan kebergantungan styler terhadap global variable sebanyak… banyak! Membolehkan lebih daripada satu Styler berfungsi pada waktu yang sama, walaupun saya tak tau projek apa yang akan buat macam tu. Perubahan tidak ketara kedua yakni layout didalam CSS sekarang ini adalah optional! Ya! Tiada lagi CSS yang panjang lebar sedangkan kebanyakannya hanyalah layout. Kebanyakan layout itu sudah dipindahkan kedalam javascript, yang menyebabkan javascript pula yang jadi panjang lebar. CSS masih lagi boleh mengandungi layout, dan layout itu akan diappend dengan layout yang sudah diberikan menerusi javascript.
Ketiga, perubahan yang masih lagi tidak ketara kepada kamu, yakni perubahan format layout styler yang sekarang ini menstandardkan kebanyakan description. Saya nak tunjuk bagaimana perbezaannya namun saya rasa itu tidak berguna kerana kamu tak faham pun apa itu layout styler. Senang cakap, kalau entah macam mana dapat hidayah nak try buat layout sendiri, kuranglah sakit kepala kamu berbanding layout yang lepas. Namun begitu, ia menyebabkan layout yang lepas takleh pakai. So kalau kamu ada buat layout sendiri, yang mana saya sangat sangat pasti tidak ada, layout kamu takleh pakai dah!
Keempat, akhirnya perubahan yang kamu boleh nampak, yakni colorpicker yang baru! Colorpicker mempunyai design yang lebih simple, namun ia ada support untuk transparency! Ya! Sekarang dengan styler, kamu boleh buat text transparent atau separuh transparent. Warning, CSS ini hanya berfungsi untuk…. kebanyakan browser kecuali IE8 dan kebawah, namun kemungkinan besar IE8 tak boleh start styler pun. So, jika kamu ialah peminat tegar IE, saya sangat recommend kamu update ke IE9, ia akan mengurangkan sakit kepala global dalam kalangan web designer dan pengguna IE sendiri.
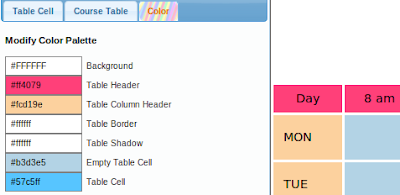
Saya nak tunjukkan gambar Colorpicker yang baru tapi nanti bocor pulak perubahan yang kelima yakni COLOR PALETTE SYSTEM!!! Ya, tujuan sebenar saya buat colorpicker sendiri adalah untuk integrate system ini. Mari kita lihat screenshot pertama……
Ya! Sekarang styler ada satu tab yang tak termasuk dalam layout yakni tab “Color”. Kat tab ini, kamu boleh ubah warna kepada palette tadi. Yang bagusnya, element yang pakai color palette tersebut juga akan diupdate. Contohnya kat atas tadi saya dah set table header punya background color untuk pakai color palette “Table Header”, so bila saya ubah color “Table Header” kat tab color menjadi magenta, element yang pakai color ini, akan update menjadi magenta! So dengan theme yang betul, kamu boleh set macam-macam color dengan hanya pakai tab ini.
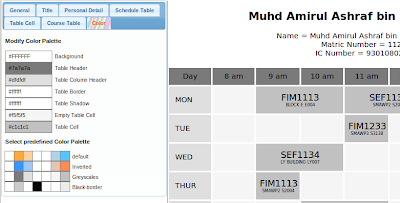
But wait, there’s more! Kat tab itu juga ada predefined color palatte! Macam palette theme. Click kat theme dan ia akan tukar color palette mengikut theme tersebut daripada ini:
Kepada ini:
So, ya macam theme jugaklah, namun begitu buat masa ini, tiada cara untuk kamu submit color palette theme. Dan kalau nak tambah color palatte pun, contoh kalau kamu nak buat color “light background”, buat masa ni satu-satunya cara adalah untuk edit css secara manual dan edit comment yang bertulis “Color Palatte”.
Maka itulah sahaja benda yang baru untuk release ini. So have fun theming your schedule, Assalamualaikum and good bye.
Introducing Squasher!
Assalamualaikum semua! Apa khabar? Saya sihat… anda juga… etc, etc.
Okay, so have I mention before that running ubuntu live from usb stick feels actually faster than an installed Ubuntu? Yes, there are several reason for that, and one of those are the installation is compressed into a squashfs image. A squashfs image should be about three times smaller than an uncompressed directory. Canonical use squashfs in the live image so that the whole ubuntu installation could fit into a CD (its DVD now). The problem with squashfs image is that, it is a read only image, meaning you can’t install anything the live image. Of course, there are ways to overcome this, like unetbootin’s persistant storage, but that is a different story. So, bottomline, when you install Ubuntu, what the installer does actually is it uncompress the squashfs image to your hard disk. Because the uncompressed file is about three times bigger, the hard disk will need to read three time more data to start your system. You can, of course, manually set up an ubuntu intallation into using a partial squashed installation by following this guide, but that for me is quite a hassle to do manually. So, I’ve come up with a script I called Squasher written in bash that will automatically compress your /usr into an image and set up fstab and help in updating the squashfs image.
Usage
So, here is how you use it. First download the script from its github repo. Copy it to wherever you want, just not in /usr. Then, install the package squashfs-tools and aufs-tools. You can use the command “sudo apt-get install squashfs-tools aufs-tools” to install it or you can click this link which supposedly will open ubuntu software center and install the package.
For example, I’ve put the squasher.sh in my home directory. Don’t put it too many folder because we will execute it in command prompt.
Then, right click on it, and press properties. Make sure you checked “allow executing file as program”. This will come in handy later.
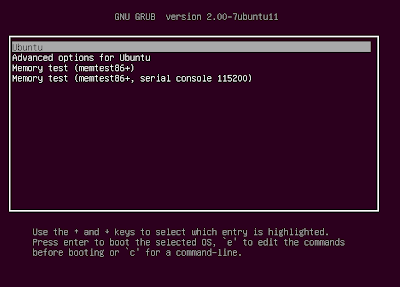
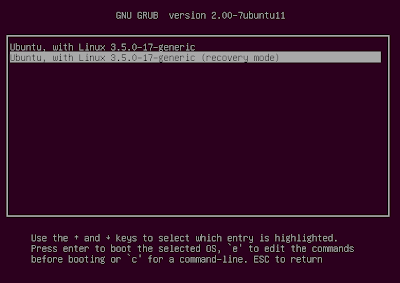
Next, restart and enter recovery mode. If you use ubuntu 12.10, the recovery mode is in the “Advanced option for Ubuntu”
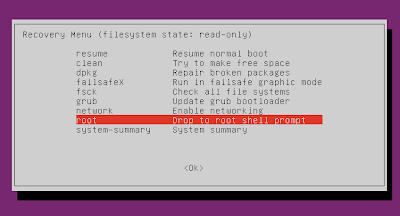
Then, on the Recovery Menu, choose “Drop to root shell prompt”.
Notice, on the bottom of the screen, you can now type stuff. Navigate to where you keep the script, and run it. If it says something like “access denied”, you probably did not check “allow executing file as program”. As a workaround, type “mount -o remount,rw /” and “chmod +x squasher.sh”.
Next, it will prompt to squash /usr. The script will start modifying the system after this, so it asked you to continue.
If you pick Yes, it will start by compressing /usr into an image.
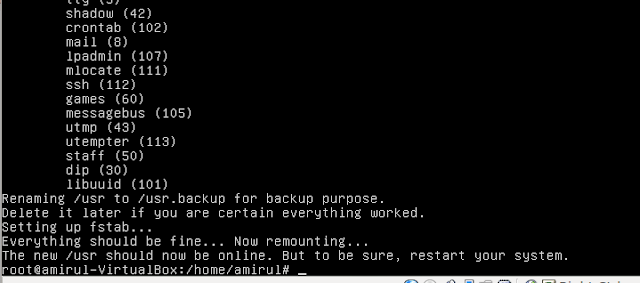
And if everything goes well, you should be prompted to restart your system.
By the way, the old /usr is not deleted. It had only been renamed to /usr.backup/. Delete it manually if you are sure everything is ok.
Now, your partial squashfs system has already been set up. You could see some load time improvement when starting applications. You can install new application, and do stuff normally. Be advised though, that new application will not be automatically compressed. In this setup, any write to /usr will be written in /var/squashed/rw. While you squashed image is mounted in /var/squashed/ro. Aufs then will merge both of these forder into /usr.
As for example, the screenshot above is right after I squashed my system. The /var/squashed/rw is empty because I have no installed anything.
Now, for example sake, I install gparted. Notice that the gparted binary is in /var/squashed/rw/bin. But it is not compressed.
To recompress it, repeat the procedure to start the script. the script will automatically detect your configuration. Make sure the parameter is about the same as above. If you did not do anything with your fstab, this should work just well.
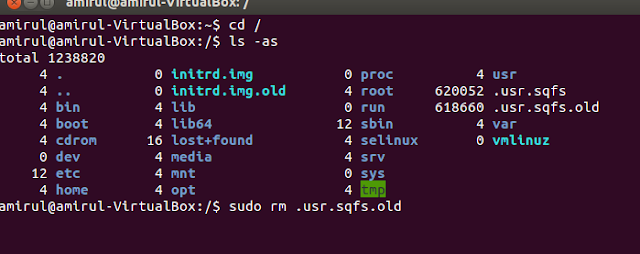
Notice on the screenshot above there are two image with size about 600MB. Delete the one with the ‘.old’ postfix, once you are sure everything is ok.
The same is also true for the read write branch. On the screenshot above, the read write branch is empty. The old rw branch has been renamed to “rw.old”. Delete it and you should see that your newly installed application is still available and compressed.
Performance gain.
On a Virtualbox I’ve notice that it does start faster, but I have no number to prove that. On my laptop, and a stopwatch, I did not see any start up loading time improvement. Uncompressed or compressed, it took 55 second to boot and start chromium. But the number do strip down to 40 second once I’ve reconfigure ureadahead. I do notice however, is that nautilus and common application do load faster in this configuration. Unfortunately it is still not as fast as using a thumbdrive. Probably because the script only compress /usr.
Summary
So if you are still using a conventional hard disk, squasher may be worth a look. Until btrfs become optimized, a squashfs image is probably a solution to speed up loading time by compression.
WARNING: If at some time you dist-upgrade your system, AppArmor profile for some of the updated file may be loaded after you restart. I’m still not sure how did this happen. So you could try removing apparmor completely, or ‘invoke-rc.d apparmor teardown’ for temporary solution.
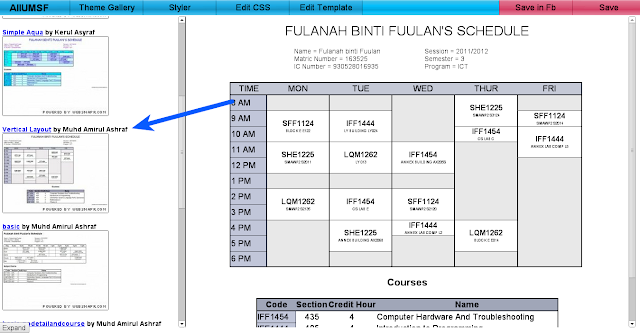
Ok, long story short, Automatic IIUM Schedule Formatter sekarang ada “Vertical Layout”, yakni jadual disusun dari atas ke bawah daripada kiri ke kanan. Untuk menggunakannya, cuma pakai theme gallery, kemudian tekan “Vertical Layout” seperti anak panah di atas, dan tada! Jadual anda secara automagically vertically layouted.
By the way, kalau korang perasan, secara default korang tak patut nampak screenshot theme kat dalam kotak macam kat screenshot atas. Itu pasal ada sikit security issue. Korang boleh “on” screenshot tu dengan tekan “allow” kat atas waktu chrome kata website ni tengah akses insecure resource.
Assalamualaikum semua! Apa khabar!
Status update:
Saya akan kembali ke CFS IIUM lusa nanti. Tada! Tak sabar nak balik. Bila dah sampai nak balik rumah pulak. Tak tetap pendirian.
YourAgregator mode:
So, semalam(kalau tak silap saya) saya dah upload YourAgregator update terkini. Untuk upload ini, saya telah update Styler, tambah kebolehan untuk PM walaupun buat masa ini, dashboard PM sangat tidak berfungsi, kebolehan Styler untuk mengubah setiap style telah ditambah so, moderator boleh ubah style Chatter dan agpages yang lain, sedikit perubahan dengan sanitize feed, ada thumbnail untuk post yang ada gambar (walaupun tak ada dalam gambar di atas), dan yang paling jelas, perubahan style asal seperti yang diatas. Somehow, saya rasa ianya tidak appropriate. But its nice to see a new face. Oh ya! Styler sekarang boleh upload gambar untuk dijadikan background.
Automatic IIUM Schedule Formatter mode:
AIIUMSF punya save to facebook button sekarang akan bukak di tab yang baru. So, there is no need for Save dulu baru Save to FB. Dan beberapa bugfix, yang paling ketara ialah sekarang ianya boleh digunakan dengan Firefox (dulu tak boleh, masalah teknikal).
Assalamualaikum semua! Apa khabar? What are you thinking? May be you are thinking “What? 4.0 already?”. Well, versi sebelum ini adalah 3.3, macam mana boleh sampai situ saya tak tau, dan kali ini ada sikit incompatible update, so “git tag v4.0”.
So whats new? Sebenarnya ada dua aje benda yang baru, pertama styler yang baru dan kedua kebolehan untuk save sebagai gambar di facebook. Styler tersebut merupakan update daripada YourAgregator yang ada sekarang yang mana datang daripada AIIUMSF yang dulu yang mana datang daripada YourAgregator yang asal. So, mari kita lihat screenshot…..
 |
| Di bawah kiri ada butang expand/shrink. |
Styler yang baru ini secara layoutnya berlainan dengan styler yang lama. Di styler yang lama, css mengandungi senarai ‘selector’ yang boleh di style-kan. Layout control, kedudukan slider untuk border, padding dan sebagainya fixed. Malangnya design tersebut sangat tidak sesuai untuk css yang mana untuk ubah sesuatu mungkin kita perlu ubah ‘parent’ kepada sesuatu itu. Tambahan lagi, ianya susah nak digunakan.
Berbeza dengan dahulu, css sekarang ini mengandungi layout kepada control tersebut. Ini bermakna, kedudukan setting sesuatu di styler boleh diubah dengan mengedit css. Kalau tak faham tak ape. Senang cakap, designer sekarang boleh meletakkan ‘control’ di tab mana yang diorang suka, membolehkan mereka untuk me-layout untuk memudahkan pengguna.
Jika kita lihat di css yang asal, ia menganding satu comment bertanda ‘layout’ yang mengandungi JSON(JavaScript Object Notation) yang menandakan kedudukan sesuatu control serta css selector yang control tersebut kawal.
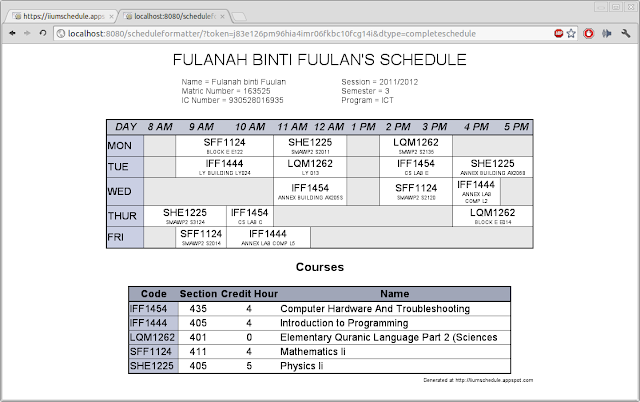 |
| By the way, ini adalah default style yang baru. |
Lagi satu tambahan AIIUMSF adalah butang “Save in FB”. Basically, ia akan keluarkan dialog di facebook meminta kebenaran untuk publish stream, benarkan dan jadual anda patut ada dalam gallery. Amaran, “Save in FB” tidak keluar dalam tab yang baru macam “Save”, dan kemungkinan besar jadual anda tidak akan render dengan betul di FB. Ianya disebabkan kelemahan Google Conversion api, dan disebabkan saya tidak menggunakan ‘server’ yang sebenar, saya tak boleh buat apa-apa untuk membetulkannya. So, saya rekemen kamu “Save” dahulu sebelum “Save in FB”.
And… thats about what it should do. Arahan penggunaan boleh didapati di iiumschedule.appspot.com, tolong like page tersebut, Bye bye dan Assalamualaikum.


